Saturday 27 November 2010

Camera and Cinematography

Camera Terminology

Camera work is extremely crucial to film making. The audience's view to the scene varies tremendously depending on the composition, camera angles and movement adopted because this directly affects the way in which they view the characters and events taking place in the scene, hence affects how they perceive the story. In a subconscious level, this affects the mood and increases the level of emotion portrayed in the scene.
This is a list of camera jargons used widely in the film industry for referring to various camera works.


Long shot:
Establishing shot: to possibly convey isolation or epic scale.

Mid shot:
Shows some part of the subject in more detail whilst still giving an impression of the whole subject. (From head to foot)

Medium close up:
Half way between a MS and a CU. (From head to shoulder)

Close up:
A certain feature or part of the subject takes up the whole frame. Conversational shot probably important to story. (From head to waist)

Extreme close up:
Head shot. Conveying extreme emotion possibly anger, despair or joy. Usually used for action sequences.


Two-Shot: 
A comfortable shot of two people, framed similarly to a mid shot.
Wide shot:
The subject takes up the full frame, or at least as much as possible. The same as a long shot.

Over-the-shoulder shot (OSS):
Looking from behind a person at the subject.

Noddy shot:
Usually refers to a shot of the interviewer listening and reacting to the subject, although noddies can be used in drama and other situations.

Point-of-view shot (POV):
Shows a view from the subject's perspective.

Weather shot:
The subject is the weather, usually the sky. Can be used for other purposes.

Very wide shot:
The subject is visible (barely), but the emphasis is still on placing her in her environment.

Extreme wide shot:
The view is so far from the subject that she isn't even visible. This is often used as an establishing shot.

High Angle:
Camera is raised up : the degree of angle will change the emotional message of the shot.

Low Angle:
Camera is by the floor looking slightly up. Again the degree of angle will change the emotional message of the shot. These shots tend to convey an emotion of fear or are dynamic, action shots. The wider the lens the more angular the shapes and therefore the more tense and dynamic.

Track and Pan:
An animation term
To convey the importance of an area or object in the shot or to define a general direction the film maker wants us to go.

Pan: ( in L.Action pan is a“dolly”)
Move again taking the audience where we want them to look.
Often this can reveal more of the environment and tell us more about the people in that environment or it could just suggest on coming danger – or happiness!

Whip Pan:
A fast pan usually following the main subjects of the film. Will convey action and excitement.

Fade:
Fade to black.

Flash Frame:
Image shown for a number of frames to convey urgency or fear.

Cross Cutting:
Cutting between two sequences to establish a relationship between them.

Cutaway (CA):
A shot of something other than the current action.

Cut-In:
Shows some part of the subject in detail.

Depth of Field:
How far open the lens is.

Large Depth of Field:
More objects in focus at one time (f/16)

Shallow depth of Field:
Limited area in focus – maybe just the foreground objects.

Deep Focus:
All objects are in focus – both foreground and background (f/8)

Racking Focus (Pull Focus):
Changing focus from one object to another to highlight the important part of the shot with the story.

Crossing the Line:
Convention that camera can be moved in any part of the shot as long as it stays on one side of the action.
If you don’t follow this rule you very often reverse the angle in consecutive shots and confuse the audience.

Dolly Zoom (Vertigo Shot):
Created by simultaneously zooming in and tracking backward; the result is that the foreground remains stable while the background expands backwards.


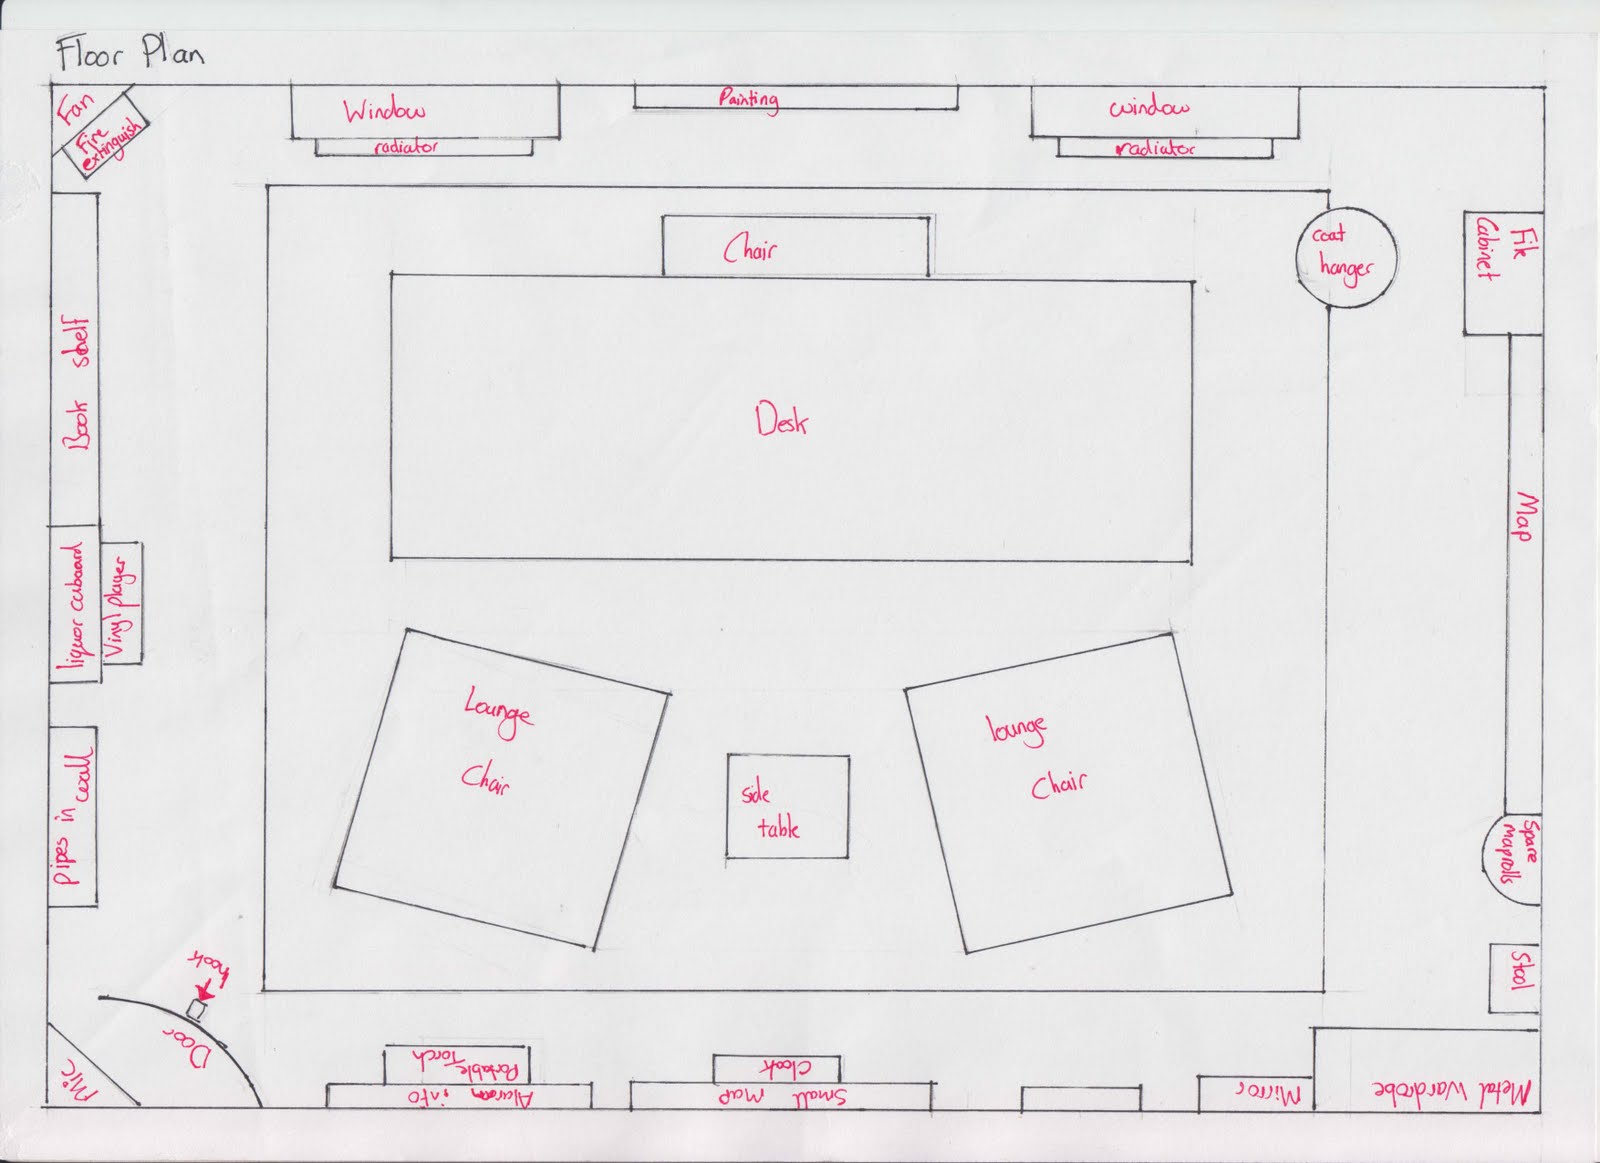
Reno and I created a motion path together using this tutorial have our camera moves along the path as we key-frame the aim of the camera to obtain different shots. Due to our theme of slow decay and the post war context, we feel that it would be nice to have only one shot through out the entire scene.


Above image was the first camera path Reno and I created. We tried to adjust the curve and have the camera looking viewing the seaforts at various angles and distances.


First Test Render from Reno Cicero on Vimeo.


Second Test Render from Reno Cicero on Vimeo.


This is the final camera path that we adjusted according to the information we got from the first and second renders from the renderfarm.

Monday 22 November 2010

HDRI Lighting and Global Illumination

Render of the seaforts fully lit.

In order to create realistic shadow that mimics the position of the sun, I decided to put in a 'point light' in the scene right in front of the sun on the 'skydome'. However, in order to reduce the render time, I placed a 'spot light' near the same area as a photon emitter for global illumination. I also reduced the intensity of the 'spot light' to zero so it doesn't add any unnecessary lights into the scene.

With the help of some third year students we have finally discovered the best HDR image that we would like to use for our render as images shown above. We used the chosen HDR image and played around with the settings a bit more, trying to create the best render result under the minimum amount of render time.


Through tutorials, we discovered various techniques of rendering in Mental Ray efficiently. Things like a 'photon map' (Image Above) with 'Map Visualiser' for example, this allows Maya to re-use the photons generated from previous renders. This allows Maya to skip the process of calculating the photons in every render and reduce the render time, as long as certain settings remain the same.


We also experimented with a few other HDR images that we can find to give different looks and atmospheres.


We then lit up the scene with the HDR image of the sky that we would like to use, but the lighting created via this image felt less effective than the previous one.


Despite, the nice looking renders, we feel that the colours of the sky from this HDR image is too mellow and does not achieve the kind of atmosphere we are looking for. So we replaced the sky with another image that we feel is closer to our goal and turned off the 'primary visibility' of the HDR image from its render stats. As a result, the lighting of the scene and colours of the sky do not match up as the image shown above.


Both images above were lit with the HDR image shown below. Through the reflection of light and colours, the scene already looks pretty nice with a few simple settings. However, image based lighting does require the activation of 'Mental Ray' and 'Final Gathering'. As a result, the render time does increase significantly depending on the settings.


HDR Maps - 3DTeachers.com


I came across the image above on the Internet while researching into HDRI. This could be a good example of the kind of HDR image that we might want to use regarding the lighting inside the seafort. However, it is very difficult to find a HDR image that is as specific as the way we want it, which is a military office inside a seafort. As a result, direct lighting with Maya is still the prior option for now.

Information from these links, a tutorial about HDRI and some demonstration from a couple of third year students provided me with a great understanding of HDRI and how it could be used in this project.
HDRI stands for High Dynamic Range Image, which is basically an image that consists a huge amount of colour data that is generated via taking photos of the same scene at multiple exposures and then combining them into a single image. Compare to a normal 8 bit image such as .jpg or .tiff, a HDR image has 32 bit of colour information stored in it. With these extra colour information, it allows 3D programs to closely mimic how the lights behave in real life and hence generate photo-realistic renders.
If we could find a HDR image that is generated from a scenery of dusk, which is how our weather condition is like, that would be incredibly efficient when it comes to lighting up the first scene with all the sea forts. However, it is still crucial to play around with direct lighting and global illumination in Maya since another side of the scene should be stormy.


Photographing this kind of light probe is one method of creating a HDR image. The benefit of this is that it captures a larger range of the scene due to its reflection property. However, there are problems such as having to remove the photographer in the reflection and the base of the tripod before the image can be used. Also, the scratches and reflectivity of the surface would also effect the image quality. 
One may also use a fish-eye lens to achieve the similar effect though it does not capture as much of the scene as a light probe does. However, this does avoid the problem of capturing the photographer and the tripod base in the image, as well as the distortion caused by the light probe surface.
For our project we are going to try and find a pre-made HDR image for our scene.


Poolball Texturing Interview (Wide3D.no)


Above image has been unwrapped into a flat image from spherical image taken through a light probe. As a result, Maya will wrap that image around a dome and project light into the scene according to the position of light sources and the exposure data stored in the image.


Above image is a comparison of a pool-ball that is lit with and without an HDR image. The result of photo-realisim achieved via HDRI lighting demonstrates that why it has been used widely to composite CGI with real life footage.


from Max-Realms.com

Above image consists a computer generated character from the famous game Half Life 2, which is nicely composited with a real life image through the use of HDRI as it captures the light information of the scene realistically and light up the computer generated character through it.

Wednesday 17 November 2010

Room Setup

Room Setup that we designed out of all the objects we found during research. We have picture references for each object in the room that we choose to use. Including even the structure of the room, such as beams and walls.


Above image is the layout of the room that we designed according to the objects that we found and decided to place into the scene. Each object in the scene has at least one high-res real life photo as reference.


Above image is the layout for all the small objects that we decided to put on the main desk in our scene. As all other objects in the room, we have at least have one high-res real life photo as reference.


Above image is the layout of structures on the ceiling. These metal pipes and plates play a big part in terms of showing the process of decay.

Tuesday 16 November 2010

Decay and Erode

Test of Decay


texture test from clean to dirty from Reno Cicero on Vimeo.

This is a picture frame modeled by Jure and textured by Ladji with and without decay. Reno filmed them both with the exact position and camera path, then brought them both into After Effect and played around with the opacity to create the feeling of decaying over a short period of time.

Derelict Places - Documenting Decay


These images taken in various seaforts are very useful real life references for the decaying of metal and stones. Through this we have a great understanding of the sense of realism that we are aiming for without the need of actually visiting the site.


This is a render from Toni Bratincevic's The Making of Slow Deay project, where he created an entire scene with old and decayed elements from a screen shot of a famous animated movie 'Ghost In The Shell'. He demonstrated in details how he built up the scene gradually starting from the first render. Not only the feel of his scene very much matches the kind of atmosphere that we are aiming for, the technique of texturing itself is significantly helpful to the production aspect of our project.


Above image is an example Toni used to demonstrate the difference between a metal ball with a default blinn shader only, in comparison to the same blinn shader but also with colour, diffuse and bump maps applied to it.


Above images demonstrate nicely the kind of looks that are contributed via each map and what the overall effect looks like. This gives us a better understanding of how various maps can be applied and incorporated within our project when it comes to texturing and creating decay effect.


Above images are taken by myself on HMS Belfast as a comparison of the metal before and after its decay. These can both be used as textures for our scene and to create the decay effect.


Above images are examples of more textures taken by myself that can be used in various parts of our scene.

Research - Churchill War Rooms

Reno and I went to the Churchill War Rooms because there are a lot of assets and interior designs that resembles a military office during the time of Second World War.
We took pictures of many objects and textures that are extremely useful for modeling, and received a great understanding of room layouts for a military office at that time period. This is very inspiring for our room setup inside the seafort.

Churchill War Rooms


Above image is a collage I made with photos I took when our group visited Churchill War Rooms. I personally believe that this place was one of the most beneficial sources that we used regarding our research because the main part of our environment is a military office in a seafort. Although none of the offices in the here were designed for seaforts, they do give us a clear layout and a sense of environment of what British army's offices were like especially for significant figures. Combining the information from Churchill War Rooms and HMS Belfast, we should have pretty much gathered information from every aspect for our environment. Also we found a huge variety of objects that could be used as references for objects that we decided to place in our scene.


Above image is a picture taken during Second World War with a number of significant military figures in a conference. We might place this image in a picture frame by our main character's sick bed as a thread to his reminiscence. (Also for the comedy effect, we might photoshop our faces onto it)


This is the main strategy room found in Churchill War Rooms. It provides a clear reference of what the military office should look like during the period of Second World War. Our office inside the seafort is based heavily on the layout of this room.

Saturday 13 November 2010

Research - Imperial War Museum

Our group went to Imperial War Museum for research, reference and production materials. A lot of items and materials are very relevant to our set time period. There are also a lot of useful textures and objects that can be used for designing the room.


Above image is a collage I made from photos I took when our group went to visit the Imperial War Museum, where we found a lot of useful objects that could be placed in the scene as they belonged to the period of Second World War. Also, the Imperial War Museum provided us with a good historical knowledge and information regarding the war period, which could be extremely helpful concerning the context of our scene setup and the storyline.


Above image is a great example of some objects that we found in the Imperial War Museum that could be placed in our environment. This the passport of a Nazi officer that we planned to place on the desk of the office inside the main seafort as a significant target for the British army.


Above image is another example of some useful objects we found in the Imperial War Museum. This is a posh and stylistic ashtray that should only be seen in the office of highly ranked officers. We planned to place this on the side table between two guest chairs across from where our main character should normally be sitting when he was working in the office. As this implies that only very important military figures would be sitting there for restricted conferences.

Research - HMS Belfast

We decided to go to HMS Belfast for research, reference and production materials because the interior structure of the ship is very similar to a seafort. However, due to the expensive ticket price for HMS Belfast, everyone in the group chipped in and paid for a ticket that allowed me to get on the ship and take photos.
Overall, this trip provides very useful source and reference for modeling and texturing. In addition, I found a lot of interesting information regarding how a battleship operates as well as historical backgrounds of the ship during the war period, which are useful for the context of our seafort.


This is a collage I made in photoshop out of some of the pictures I took in HMS Belfast. They are very good reference for modeling as well as research material because certain aspects of a warship resembles the environment of seaforts.


Picture of a metal valve that is used to control water or gas pressure on HMS Belfast that could be placed inside or on the top of seaforts to give more details to our environment and make it more visually interesting.


Picture of ropes I took on HMS Belfast that could be used as one of the objects inside or on top of seaforts to make the environment more variable and interesting.

Friday 12 November 2010

Surrealism Imagery

The surrealistic use and combination of realistic objects depict depth and messages in an interesting yet abstract manner.

Surrealism.org

The Art of Charnine - Metaphysical Expressionism

The slot machines and roulettes coming out of the snail's broken shell followed by the waste laid behind demonstrates the destruction and impact of gambling.

Same surrealistic style adopted in real life photography.