texture test from clean to dirty from Reno Cicero on Vimeo.
This is a picture frame modeled by Jure and textured by Ladji with and without decay. Reno filmed them both with the exact position and camera path, then brought them both into After Effect and played around with the opacity to create the feeling of decaying over a short period of time.
Derelict Places - Documenting Decay


These images taken in various seaforts are very useful real life references for the decaying of metal and stones. Through this we have a great understanding of the sense of realism that we are aiming for without the need of actually visiting the site.

This is a render from Toni Bratincevic's The Making of Slow Deay project, where he created an entire scene with old and decayed elements from a screen shot of a famous animated movie 'Ghost In The Shell'. He demonstrated in details how he built up the scene gradually starting from the first render. Not only the feel of his scene very much matches the kind of atmosphere that we are aiming for, the technique of texturing itself is significantly helpful to the production aspect of our project.
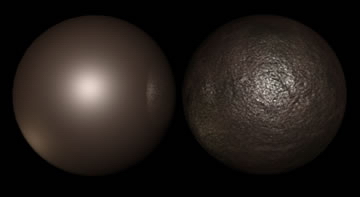
Above image is an example Toni used to demonstrate the difference between a metal ball with a default blinn shader only, in comparison to the same blinn shader but also with colour, diffuse and bump maps applied to it.


Above images demonstrate nicely the kind of looks that are contributed via each map and what the overall effect looks like. This gives us a better understanding of how various maps can be applied and incorporated within our project when it comes to texturing and creating decay effect.


Above images are taken by myself on HMS Belfast as a comparison of the metal before and after its decay. These can both be used as textures for our scene and to create the decay effect.


Above images are examples of more textures taken by myself that can be used in various parts of our scene.
No comments:
Post a Comment