Tuesday, 11 January 2011

The Room

Items below are examples of from our second scene, The Room, inside the main seafort, which was the military office that our character used to work in when he was a commanding officer during World War II. As he reaches the end of his life, he reminisces the past and the prime of his life where majorly took place during the war in that office. As our theme is decay, we would have two renders of a clean version of the room and then a decayed version of the room then have fade into each other as the camera looks through the room. However, insufficient amount of time available as well as having to deal with a lot of extra problems, we had to neglect this transition for the submission and have only the decayed version instead. Despite this we would love to finish this aspect of the project in our own time after the submission.
Below images come in a sequence of three. Starting from Jure's models of gray mesh, comes with the model with Ladji's textures as the second image followed by the lighting that I did for the room.


Fan


Wine bottle, Whisky glass and Wine glass


Main Office Chair


Map


Pocket Watch


Vinyl Player


Wardrobe


Above image is a render of the room fully lit in order us to see how the room would look with objects placed in particular positions.


Above image is a render that we did as we were placing the items onto the desk.


The Room


Lighting for the room:


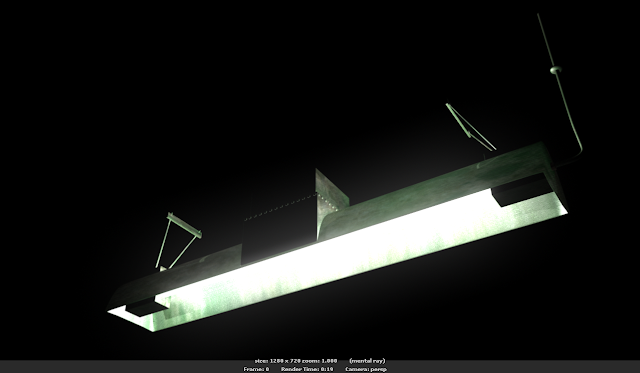
This is the main light source in the room that was modeled by Jure and textured by Ladji. I placed in an cylindrical 'area light' into the light tube and applied a 'surface shader' on the tube. After turning up the 'out glow colour' it gives the nice looking glow around the tube. Also I turned up the 'translucency' for the light container so there is a bit of the light penetration as many objects in real life.


Above image is the secondary light source in the room, the desk lamp. This was also modeled by Jure and textured by Ladji as any other object in the room. I again applied a 'surface shader' to the light bulb itself and increased the 'out glow colour' to give the light rim around the bulb. Resembles the main light, I located the texture shader in Maya for the top section of the lamp and increased the 'translucency' to give the effect of light penetrating through objects next to them.


Due to lack of time, we might have to just give in a Maya render for the submission. The quality of the light effect as well as the models would significantly increase as a result if that is the case.


Above image is the third light source that I placed into the room. Although the main light and the lamp can provide a realistic projection of light but with the lack of Global Illumination in Mental Ray renders, there was simply not enough indirect lighting bouncing around the room to light up the rest of the objects. As a result, I placed in a volume light and had it wrapped around half of the room as the image above. The reason why I choose this shape is because the four corners of the room won't be lit as much as the rest of room, which imitates closely to how a light container in that shape would normally behave.


This image demonstrate the darkened corners and edges of the room that I described above, though this is not a result of the final lighting.


Above images are the result of my final lighting in the room rendered in Maya software. Looking from a distant, it is not as bad as we imagined. However, as long as the camera approaches the objects, we realised the quality is dramatically reduced, not only the lighting but also the quality of the models.


This is a comparison between the difference in quality of Maya Software and Mental Ray renders.

Seaforts

The group came up with the idea of seaforts and the theme diverted from surrealism into decay and erosion. We discovered a lot of information about seaforts, such as their background and the way they function. Since the seaforts were originally used for military purposes during the Second World War, we decided to use this time period as our backstory for our seaforts.


This picture and the source website provides detailed information about the seaforts demonstrating how they were used in the war periods.


These give a good overview of what seaforts look like from a distant and its structure of positioning.


These pictures provide more details of the seaforts, giving a clear look of what they look like from the bottom.

Jure is the modeler of our group. As soon as we decided our ideas on the seafort environment, he immediately started modeling according to the reference pictures we found as well as this blue print shown above. Modelers often have an idea of how the objects should be textured, so Jure even textured all the seaforts himself with low resolution textures.


Above image shows how Jure builds up the links between each seafort and the main one, so the textures could be updated quickly by referencing from the main seafort. This way we saved a lot of time by not having to texture every single seafort from scratch.


Above image is a render of all the seaforts in place before the first render test on the renderfarm.


As soon as we got the seaforts from Jure, I immediately started to play around with the lighting while Reno was putting the ocean into the scene. Apart from the great looking colours and reflections provided by the HDR image, I also added a point light near the location of the sun on the sky dome generated by image based lighting to imitate the sunlight. In addition, I placed in a spotlight aiming towards the seaforts from the direction of the sun and set the intensity to zero but activates the photon generation. This way the spot light could provide a certain level of indirect lighting as well as some light spills from the seaforts onto the ocean, even though it might not be very noticeable. By setting its intensity to zero, it prevents the unnecessary light source that complicates the scene.


Ladji is our texturer, he immediately started playing around with the textures as soon as he got the models from Jure. Above images demonstrate how Ladji created his own textures by combining various textures together and then made a bump map out of it.


Above images showed how Ladji created the texture for the base supporting structures of the seaforts by combining textures in photoshop as well as creating a bump map out of them for the realistic 3D effect.


When Jure was done with all the seaforts, Ladji took over the models and replaced Jure's low resolution textures with higher resolution textures. However, the renderfarm was unable to render out the seaforts with Ladji's textures successfully. Concluded from a series of tests, we suspect it was due to the texture resolutions being too high so we had to use Jure's textures for the first renderfarm test because we had to improve the motion path through a full render.

After the first render test we added more interesting shots into the camera motion path so the audience will be able to look at the seaforts at various angles and distances. However, after seeing the second render test we realised that the resolution of Jure's textures were too low and the seaforts look very rough and unrealistic as the camera approaches the models. (See images below)


The models look quite nice when the camera is far away from them.


As soon as the camera approches the quality of the textures became obvious. As a result, we decided to have Jure redo some of the textures for the seaforts and improve the quality for the close-ups.


Above images is a comparison of the same texture before and after Jure improved it.


This is another example of Jure's improvement on the textures for the seaforts.


Above image is a render of a seafort with Jure's textures after he improved it from the second render test.

Starting from the beginning, Reno and I have always been adding elements like lighting, camera path and ocean for example, into the scene file of Jure's seaforts, so we did not have any problem with relinking the textures.
However, after Jure redid the textures for the seaforts we had a lot more elements in the scene apart from the seaforts, therefore we imported Jure's new seaforts into our scene and moved them into the right positions after we relinked the textures. Everything seemed fine at start, but when we finished everything and attempted to put it renderfarm, all the new textures stopped showing up no matter how many times we reset the project. The weird thing was that everything works fine on Reno's laptop, but nothing else.
After a whole day of numerous "trail and error" and discussion with all our group members, Ladji mentioned that he read from somewhere about the texture files should be placed in the 'Sourceimages' folder instead of the 'Texture' folder... (=.=")


Above images are the final version of the textures improved by Jure, hence the final look of our seaforts.


In order to decrease the rendering time for the fine adjustments, I placed in the main shadows until the final render.
Above images demonstrate how I placed a plane on top of the ocean in order to see the shadows with clarity without the ocean distortion. I used raytrace shadows because of its realistic way of casting shadows, as well as the simplicity of its adjustments of only two attributes (shadow rays and radius).


Above images are renders of the scene with shadows, the final textures of the seaforts and the final look of the ocean after the second successful render from the renderfarm.