Items below are examples of from our second scene, The Room, inside the main seafort, which was the military office that our character used to work in when he was a commanding officer during World War II. As he reaches the end of his life, he reminisces the past and the prime of his life where majorly took place during the war in that office. As our theme is decay, we would have two renders of a clean version of the room and then a decayed version of the room then have fade into each other as the camera looks through the room. However, insufficient amount of time available as well as having to deal with a lot of extra problems, we had to neglect this transition for the submission and have only the decayed version instead. Despite this we would love to finish this aspect of the project in our own time after the submission.
Below images come in a sequence of three. Starting from Jure's models of gray mesh, comes with the model with Ladji's textures as the second image followed by the lighting that I did for the room.
Fan
Wine bottle, Whisky glass and Wine glass
Main Office Chair
Map
Pocket Watch
Vinyl Player
Wardrobe
Above image is a render of the room fully lit in order us to see how the room would look with objects placed in particular positions.
Above image is a render that we did as we were placing the items onto the desk.
The Room
Lighting for the room:
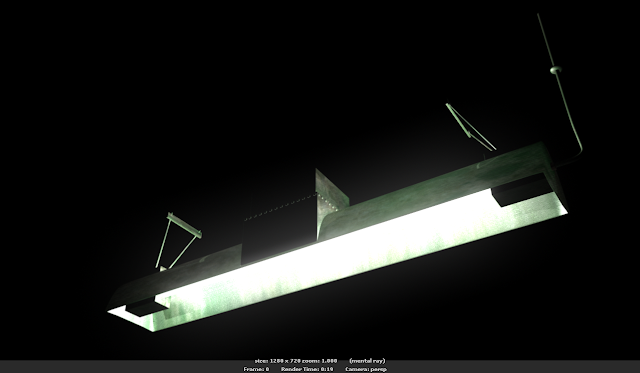
This is the main light source in the room that was modeled by Jure and textured by Ladji. I placed in an cylindrical 'area light' into the light tube and applied a 'surface shader' on the tube. After turning up the 'out glow colour' it gives the nice looking glow around the tube. Also I turned up the 'translucency' for the light container so there is a bit of the light penetration as many objects in real life.
Above image is the secondary light source in the room, the desk lamp. This was also modeled by Jure and textured by Ladji as any other object in the room. I again applied a 'surface shader' to the light bulb itself and increased the 'out glow colour' to give the light rim around the bulb. Resembles the main light, I located the texture shader in Maya for the top section of the lamp and increased the 'translucency' to give the effect of light penetrating through objects next to them.
Due to lack of time, we might have to just give in a Maya render for the submission. The quality of the light effect as well as the models would significantly increase as a result if that is the case.
Above image is the third light source that I placed into the room. Although the main light and the lamp can provide a realistic projection of light but with the lack of Global Illumination in Mental Ray renders, there was simply not enough indirect lighting bouncing around the room to light up the rest of the objects. As a result, I placed in a volume light and had it wrapped around half of the room as the image above. The reason why I choose this shape is because the four corners of the room won't be lit as much as the rest of room, which imitates closely to how a light container in that shape would normally behave.
This image demonstrate the darkened corners and edges of the room that I described above, though this is not a result of the final lighting.
Above images are the result of my final lighting in the room rendered in Maya software. Looking from a distant, it is not as bad as we imagined. However, as long as the camera approaches the objects, we realised the quality is dramatically reduced, not only the lighting but also the quality of the models.
This is a comparison between the difference in quality of Maya Software and Mental Ray renders.


No comments:
Post a Comment